We have seen many leveling kits and have thought to review this one, because we think, after comparisons, this auto-leveling kit which is very versatile and with many features. In this review we would show you its specifications and their uses. So let’s dig deep and see what we have got for you.
I. Wide Application
(i) The Creality CR Touch auto-leveling kit is a versatile tool designed to help with the leveling process of specific 3D printers. It is compatible with certain models that have either a V4.4.2 or V4.2.7 motherboard. These are common motherboards in Creality printers, ensuring stable performance.
No products found.
(ii) The compatible printers include the following:
- Ender 3 – A popular entry-level 3D printer.
- Ender 3 Pro – An upgraded version of the Ender 3 with additional features.
- Ender 3 V2 – A newer version of the Ender 3 with a more refined design.
- Ender 5 – A larger printer with a different design compared to the Ender 3 series.
- Ender 5 Pro – A more advanced version of the Ender 5 with additional features.
- CR 10 – A larger format printer that is ideal for bigger projects.
(iii) Important Note – This kit is not compatible with other printers. It is essential to verify your 3D printer model and the motherboard version before purchasing the CR Touch kit to ensure compatibility.
II. How to Update the Firmware
Updating the firmware is a critical step to ensure the CR Touch functions properly with your 3D printer. Here are the steps broken down:
(i) Download the Correct Firmware
Visit Creality’s official website, where you will find firmware files specific to your 3D printer model. Make sure you select the correct firmware version that matches both your printer model and motherboard version (V4.4.2 or V4.2.7).
(ii) Copy the Firmware to an SD Card
After downloading the firmware, transfer the file to an SD card. This SD card will be used to update the firmware directly on the printer.
(iii) Rename the Firmware File
The file must be renamed to “123.bin” so that the printer can recognize and apply the update. This step is important to ensure the printer reads the file correctly.
(iv) Insert the SD Card into the Printer
Place the SD card into the printer’s card slot. Make sure the printer is powered off during this step.
(v) Power On the Printer
Once the SD card is inserted, turn the printer on. The printer will automatically detect the firmware file and begin the update process for the CR Touch.
Note – Be sure to double-check your motherboard version before downloading and updating the firmware, as using the wrong version can cause issues.
III. Reliable Performance
(i) Creality’s Research and Development
The CR Touch system was developed by Creality’s research team based on extensive data collected from millions of users. This means the tool is designed to meet the needs of creators by providing a stable, reliable, and efficient leveling solution.
(ii) Comparison to Traditional Auto-Leveling
Unlike traditional auto-leveling systems, which can be limited in their compatibility with various printers, the CR Touch is built to work with a wider range of 3D printers. It is also more cost-effective while providing a longer service life.
(iii) Durability
The CR Touch can be used over 100,000 times, making it a long-lasting solution for anyone using a 3D printer frequently. This makes it a valuable investment for maintaining print quality over time.
IV. Smart Leveling and Multi-Point Detection
(i) Multi-Point Detection System
The CR Touch uses a system that checks several points on the printer’s platform. These points are used to determine the height at different locations across the surface of the print bed. This data is crucial for achieving a perfectly leveled platform.
(ii) Virtual Bed Leveling
Using the height measurements from each detection point, the system builds a virtual map of the print bed. This map allows the software to calculate any tilt or unevenness in the platform.
(iii) Automatic Compensation
Based on the virtual map, the CR Touch automatically adjusts the height of the nozzle in real time during printing. This ensures that the nozzle stays at the correct distance from the bed, even if the bed is slightly uneven. This results in higher-quality prints with fewer issues like poor adhesion or uneven layers.
V. Strong Compatibility
(i) Compatible Bed Types
The CR Touch is compatible with a variety of different print bed surfaces, making it a flexible tool for different users:
- PEI Bed – A popular surface known for good adhesion and easy removal of prints.
- Sticker Bed – A simple adhesive surface used for certain prints.
- Glass Bed – A smooth surface that provides excellent print quality and easy removal.
- Metal Bed – A durable option that offers a strong foundation for printing.
(ii) This flexibility allows the CR Touch to work with different bed materials without compromising its auto-leveling performance.
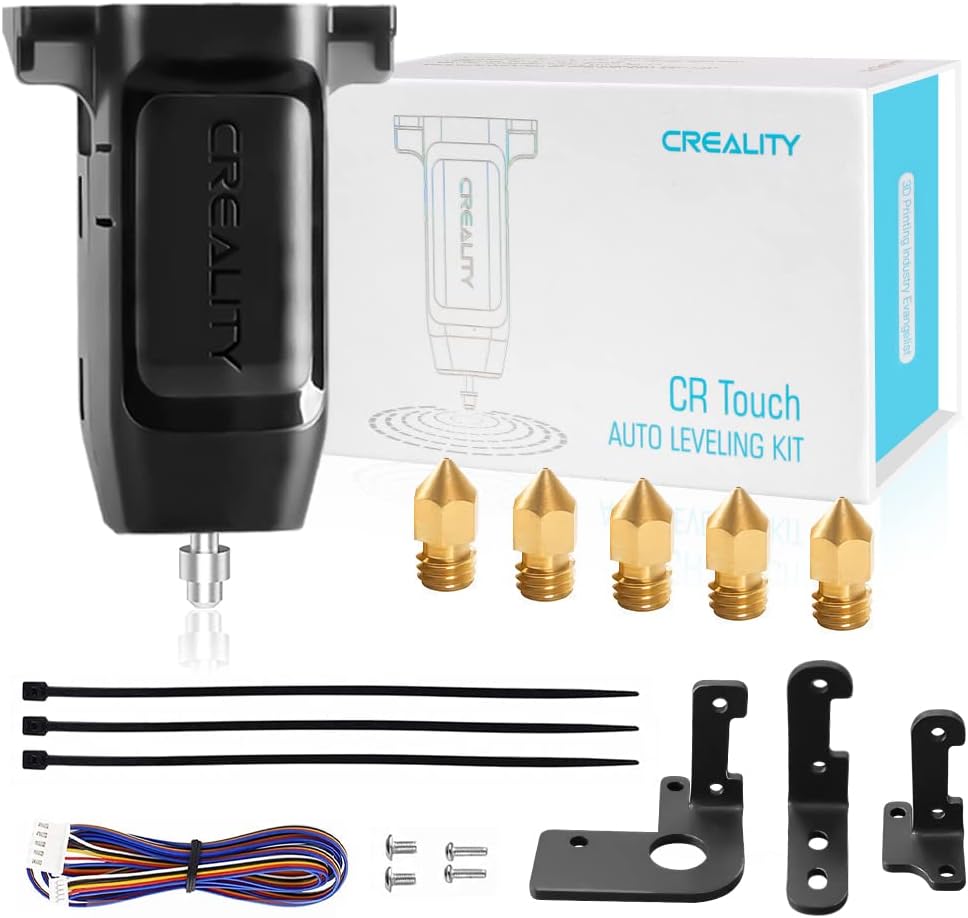
VI. What’s Included in the Package
When you purchase the CR Touch auto-leveling kit, you will receive several components –
(i) CR Touch Auto-Leveling Sensor
This is the main device that enables automatic bed leveling.
(ii) Five 0.4mm Nozzles
These replacement nozzles are included to ensure you have spares for your 3D printer.
(iii) Three Mounting Brackets
The kit comes with three different brackets for mounting the CR Touch on compatible printers.
(iv) Installation Guide
A step-by-step guide is included to help you install the CR Touch sensor correctly.
(v) Three Cable Ties
These ties help keep cables organized during installation, reducing clutter and preventing them from interfering with the print.
(vi) Four Screws
Screws are provided to securely mount the CR Touch and other components.