Prusa i3 MK3S+, a 3D printer that continues to make waves in the market. As of 2024, this printer remains a heavyweight champ, and I’ll cover its key features, performance, and the changes it has seen, if there are any recently. Well, to cut long story short let’s revisit this amazing 3d printer keeping in mind the demands in 2024 and for the next year 2025 which considered a year of the advanced 3d printers.
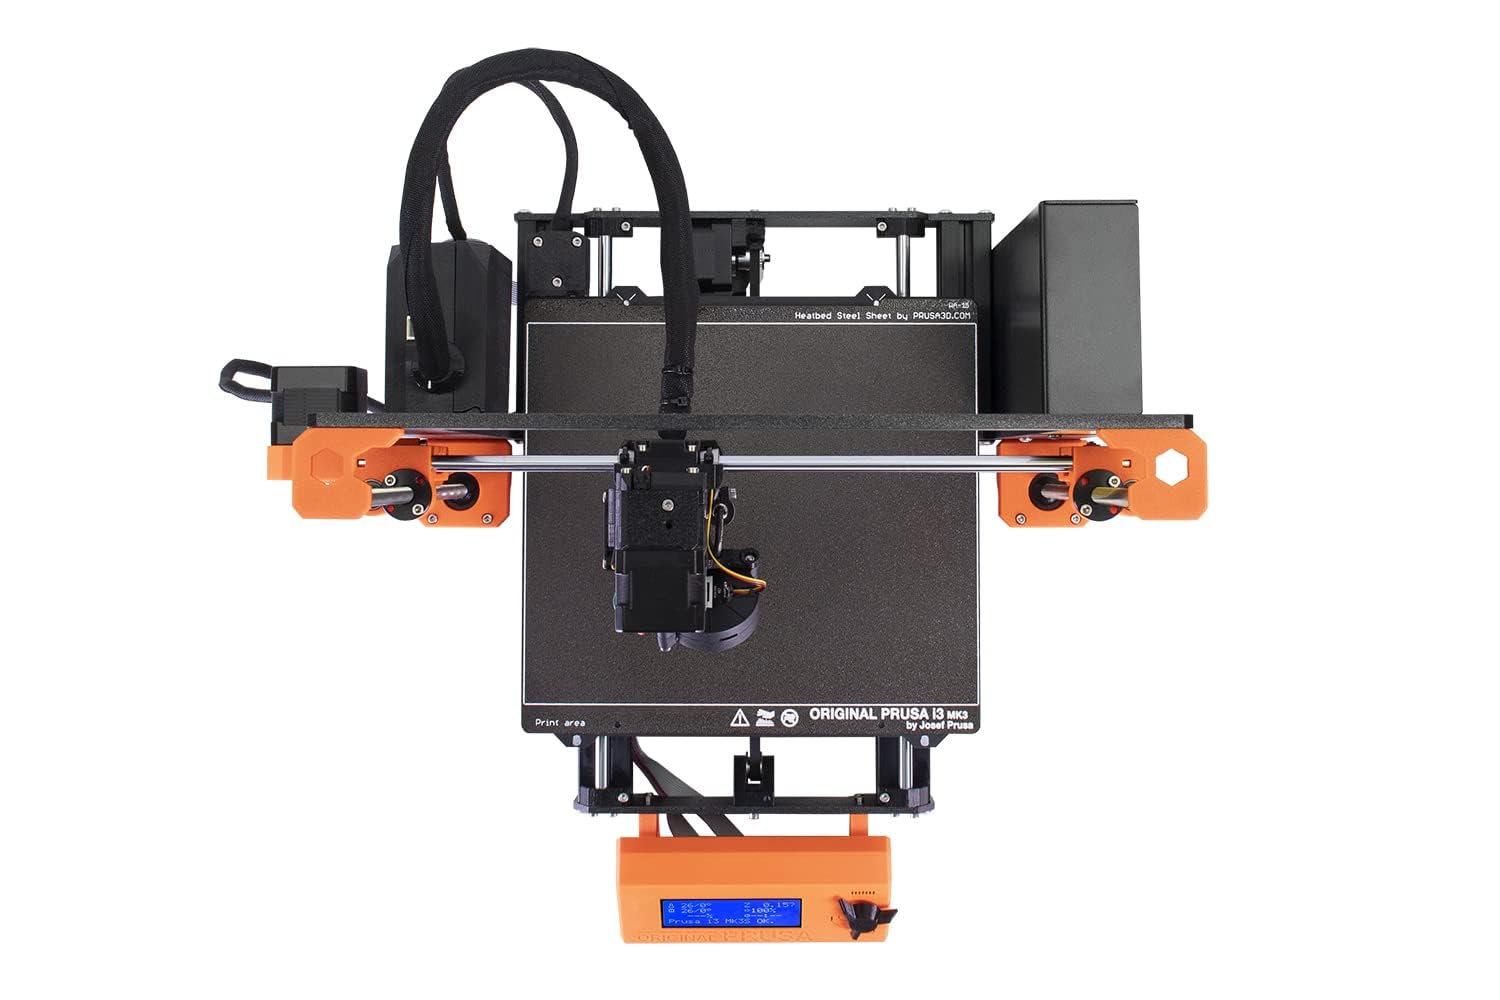
#1 The Design Of i3 MK3S+
No products found.
Like I have mentioned previous that this high end 3d printer of 2024 has a very compelling and visually distinct design, featuring bright orange printed parts that have become synonymous with the Prusa brand. Not just that, but it gets instantly recognizable, this color scheme reinforces their branding across the machine. In fact, you would find the word “Prusa” printed, engraved, or etched into the MK3S+ in no less than 25 places (or 29 if you’re using their Prusa Polymers Prusament PLA material).
#2 The Overall Performance
(I) Price Point The MK3S+ comes with a price tag of $999 for an assembled machine or $750 for a DIY kit. While this places it toward the higher end for openformat consumer 3D printers, the features justify the cost.
(II) PrusaSlicer The included slicing software, PrusaSlicer, provides bestinclass model slicing. It’s intuitive, powerful, and optimized for Prusa printers.
(III) Flexible Build Platform The MK3S+ sets the standard with its flexible build platform. This feature simplifies print removal and minimizes the risk of damaging delicate prints.
(IV) Automatic Bed Leveling Say goodbye to manual bed leveling headaches. The MK3S+ handles this automatically, ensuring consistent first layers.
(V) Stealth Mode If you value a quiet printing experience, the Stealth Mode enables nearly silent operation.
#3 The Performance in Default Settings
So,having compared the MK3S+ with current popular 3d printers of 2024s, we have noticed that this one delivers exceptional prints straight out of the box. While not drastically different from its predecessor, the updates enhance overall performance. Whether you’re a professional or a hobbyist, this easy-to-use machine won’t disappoint.
#4 Material Filament Compatibility
(A) The raw material we use plays a key role here, and always remember to adjust settings (such as nozzle temperature, bed temperature, and cooling) based on the material you choose. Experimentation and finetuning are key to achieving optimal results! This amazing 3d printer is compatible with a wide range of materials, including:
- (i) PLA (Polylactic Acid) – A popular choice for beginners due to its ease of use and low warping. PLA is biodegradable and available in various colors.
- (ii) PETG (Polyethylene Terephthalate GlycolModified) – PETG combines the best of both PLA and ABS. It’s durable, heatresistant, and less prone to warping. Great for functional prints.
- (iii) ABS (Acrylonitrile Butadiene Styrene) – ABS is known for its strength and durability. However, it requires a heated bed and proper ventilation due to fumes during printing.
- (iv) TPU (Thermoplastic Polyurethane) – TPU is a flexible filament suitable for creating rubberlike parts, such as phone cases or gaskets.
- (v) Nylon – Nylon offers excellent mechanical properties but can be challenging to print due to its high moisture absorption. Dry storage is essential.
- (vi) ASA (Acrylonitrile Styrene Acrylate) – Similar to ABS but with better UV resistance, making it suitable for outdoor applications.
- (vii) PC (Polycarbonate) – PC is strong, heatresistant, and transparent. It requires a heated chamber for successful printing.
(B) Metal/Wood Filament
We can use woodfilled and metalfilled filaments for using the Prusa i3 MK3S+ as well. SEE THE DETAILS BELOW:
(i) WoodFilled Filaments
Woodfilled filaments typically use PLA as the base material infused with fine wood particles. These filaments imitate the appearance of wood. They offer an aesthetic appeal, resembling real wood. However, their mechanical strength and layer adhesion are inferior to nonmodified filaments. Use a minimum 0.6 mm nozzle and 0.2 mm layer height to prevent clogging due to large wood particles. Avoid using the MMU2S upgrade, as these filaments tend to be brittle. You can gently sand the surface with wet sandpaper (6001500 grit) and use polishing paste for an authentic wood-like finish.
(II) MetalFilled Filaments
Metal filaments contain actual metal powder (e.g., copper, bronze, brass, stainless steel) mixed with PLA. They provide a realistic metallic weight and feel, but printed parts are brittle. Metal-filled filaments are abrasive and require a wear-resistant nozzle (hardened steel).
For best print quality make sure to reduce retractions to prevent clogs and be cautious with overhangs and bridges due to the filament’s weight. You can polish metal filled prints for an authentic metal look, although mechanical properties won’t match real metal.
#5 Pro Printing Hacks For 2025
If you are vying for high quality printing results in 2025 and you have just started over, we highly recommend reading these pro tips for 3d printing:
(a) Variable Layer Height (Vase Mode)
- Vase mode allows you to create hollow, singlewalled objects with a continuous spiral path. It’s ideal for vases, cups, and decorative items.
- Set the layer height to match your nozzle diameter (e.g., 0.4 mm nozzle = 0.2 mm layer height).
- Disable infill and top layers. The printer will follow the outer perimeter in a continuous loop.
(b) Multi-Material Printing (MMU2S)
- If you have the MMU2S upgrade, experiment with multimaterial prints
- Combine different colors or materials in a single print by switching between filaments during layers.
- Calibrate the MMU2S thoroughly to avoid jams and filament loading issues.
(c) Ironing (Neosanding)
- Ironing smooths the top layer of your print, giving it a polished finish
- Enable “Ironing” in PrusaSlicer and adjust settings like ironing flow and speed
(d) Linear Advance Calibration
- Linear Advance compensates for pressure differences in the hotend during fast movements
- Calibrate it using test prints and finetune the Kfactor for better extrusion consistency
(e) Temperature Tower and Filament Profiles
- Print a temperature tower to find the optimal temperature for your filament.
- Create custom filament profiles in PrusaSlicer to finetune settings for specific materials.
(f) Enclosures and Heated Chambers
- Build or purchase an enclosure to maintain stable ambient temperature during printing.
- For hightemperature materials like ABS or PC, consider adding a heated chamber.
(g) Custom Supports and Tree Supports
- Instead of relying on automatic supports, design custom supports using software like PrusaSlicer.
- Tree supports are efficient and minimize material usage while providing adequate support